
Timothé Chauvet
Monday, April 21, 2025
Discovering Cloudflare Workers
I developed a small web app that retrieves temporary codes I receive by email. A rather odd idea if the goal is for anyone to be able to log into my accounts… Which was precisely my goal.
I had already registered my domains into Cloudflare to catch all received emails. I thought I had explored all the free features of the beast.
Apparently not.
In this blog post I wrote down how I used Cloudflare Workers to create an app that fetches temporary codes sent by mail, and also 2nd-factor Authentication (2FA) ones, and expose them on a simple website.
This article assumes you already registered your domain on Cloudflare.
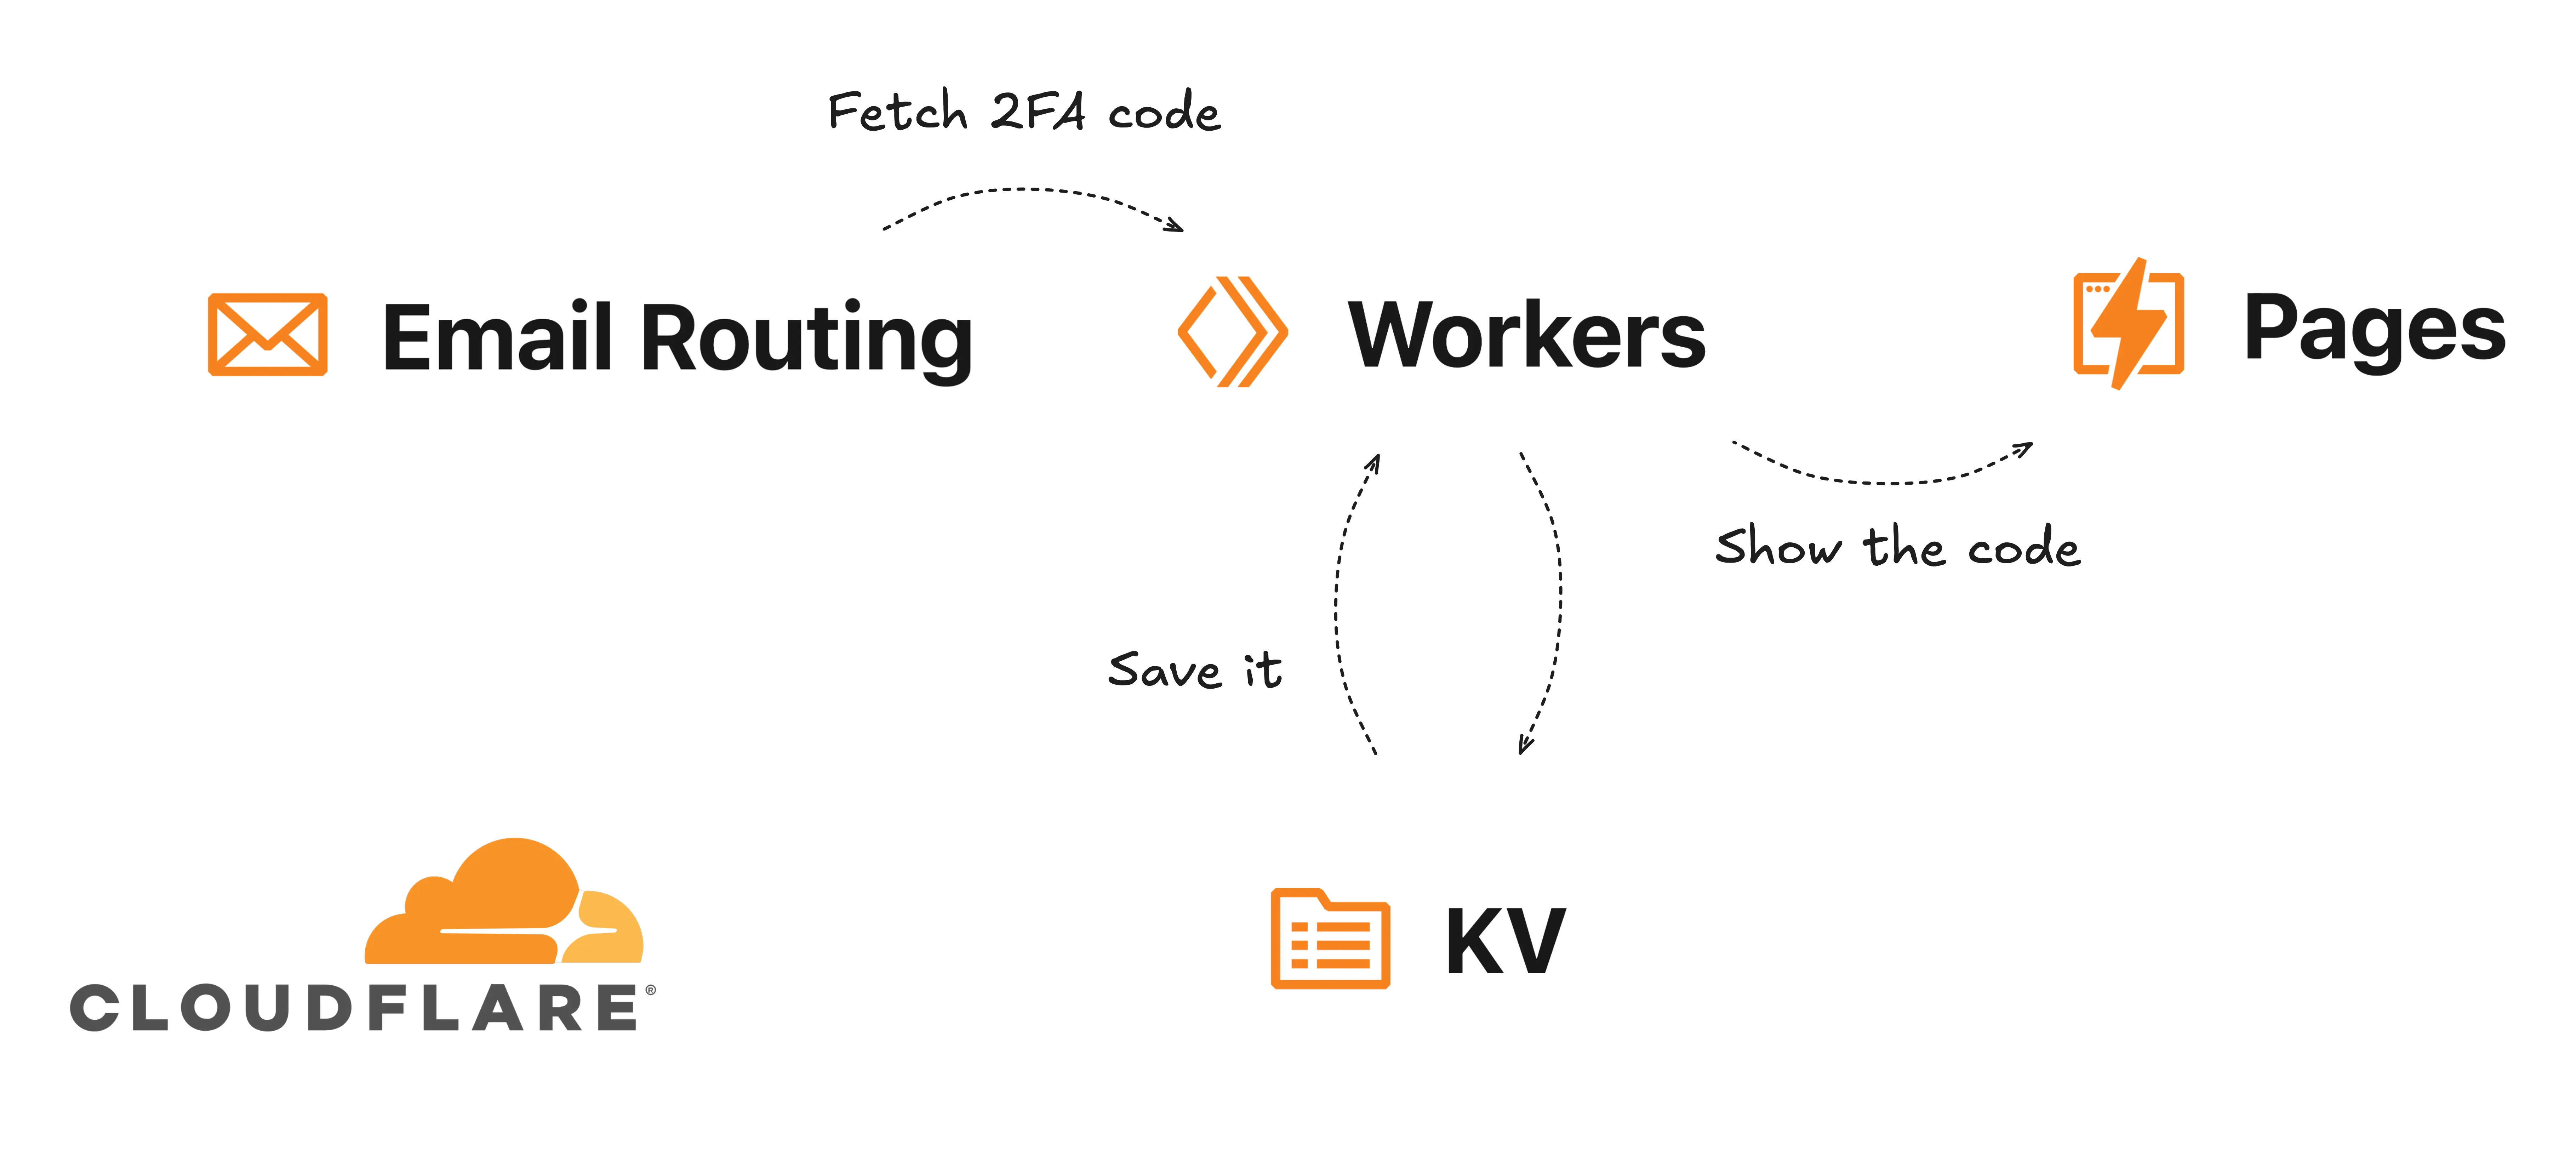
My app's diagram
Cloudflare Workers
Using the Email / Email routing tab, I discovered there was this “Email Workers (beta)” option next to the “Routing rules” I had been using for my catch-all setup. I clicked Create to see what it was about, and that’s where I discovered Workers.
It’s basically Cloudflare’s “functions” or “serverless” service. Using JavaScript code, you can program a logic triggered upon receiving an event: an incoming email.
Once the basic Worker is created, I linked it to my incoming emails. Going back to “Routing rules” from the “Emails”, then “custom addresses”, I set up thoses sent to my-account@whitemail.fr, with the action set to “Send to a Worker”, targeting the Worker I just created. Then I need to develop my app.
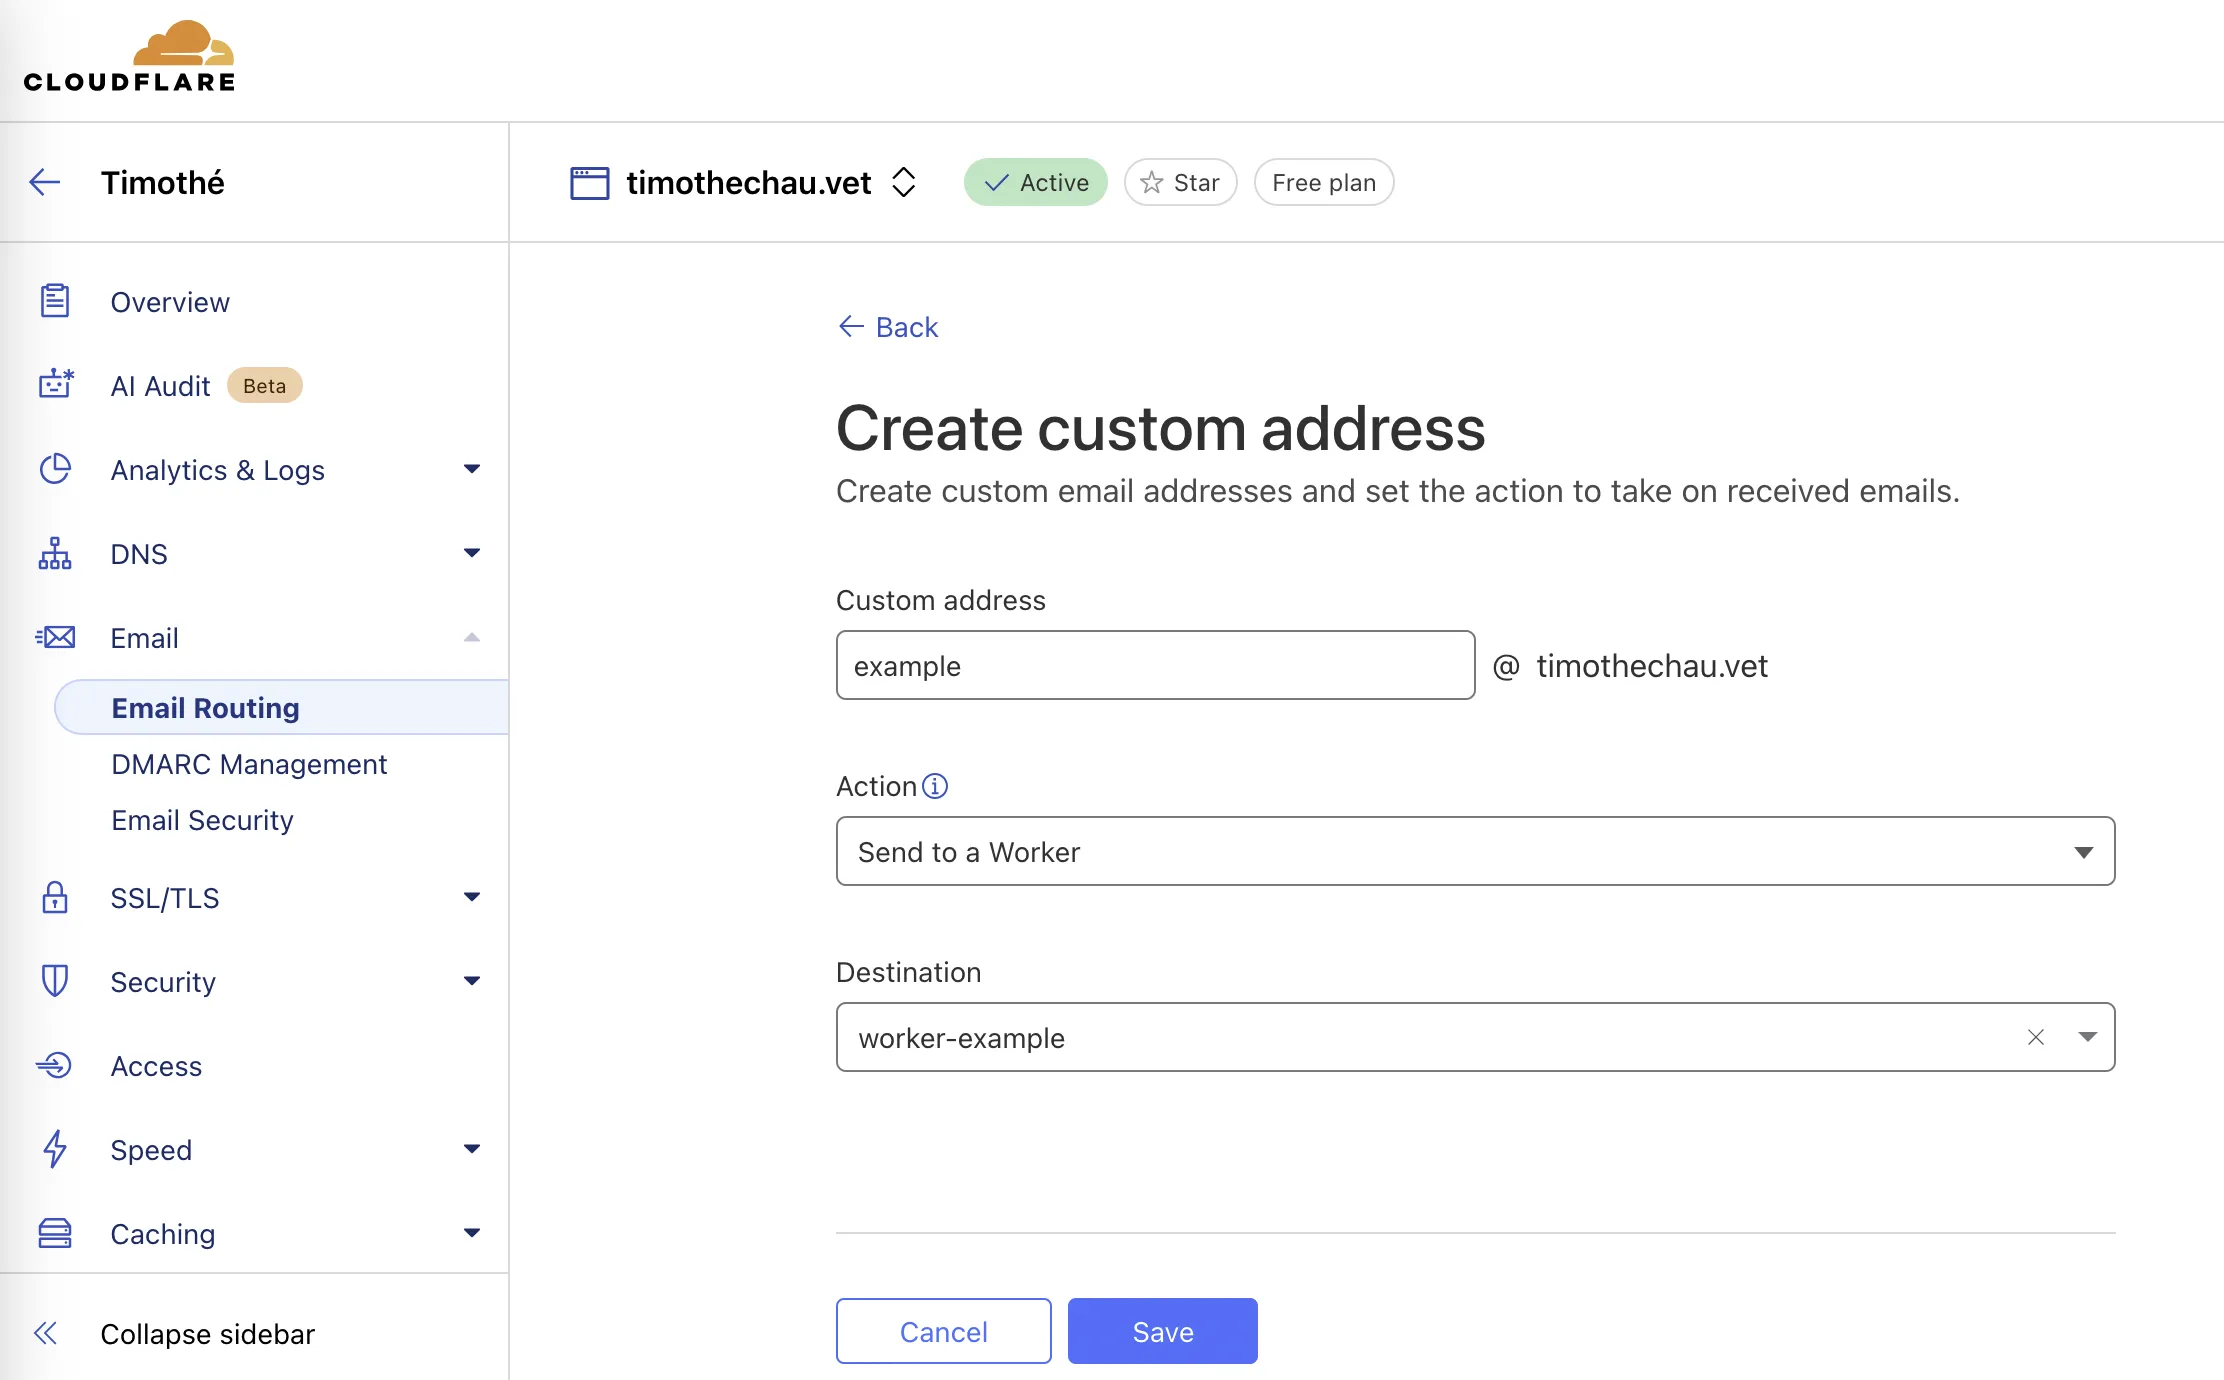
Emails received at this address will be forwarded to the Worker
Retrieving codes received by email
For this project, I want to disclose these information:
- The temporary code I receive by email.
- The TOTP code that expires every 30 seconds.
Since my Worker is triggered upon receiving an email, this email can be parsed as an argument.
To develop it, I go to my Worker and can program it using the </> button.
export default {
  // So here I receive the email, and I can parse it
  async email(message, env, ctx) {
    // Here I get the email subject
    const subject = message.headers.get("subject");
    // If it matches, I run my program
    if (
      message.to === "example@timothechau.vet" &&
      message.from === "noreply@linkedin.com" &&
      subject.startsWith("Your code is ")
    ) {
      // Regex to extract the code from the subject
      const match = subject.match(/\d{6}/);
      if (match) {
        // I'll talk about this right after
      }
    }

    // And here I forward everything to my personal email
    await message.forward(env.MAIL_FORWARD);
  }
}
You need to click “Deploy” for it to be online.
The thing with my code is that I need it to be saved somewhere to be able to distribute it. I used Cloudflare’s KV store for this. You just need to create a “namespace”, and you’re set.
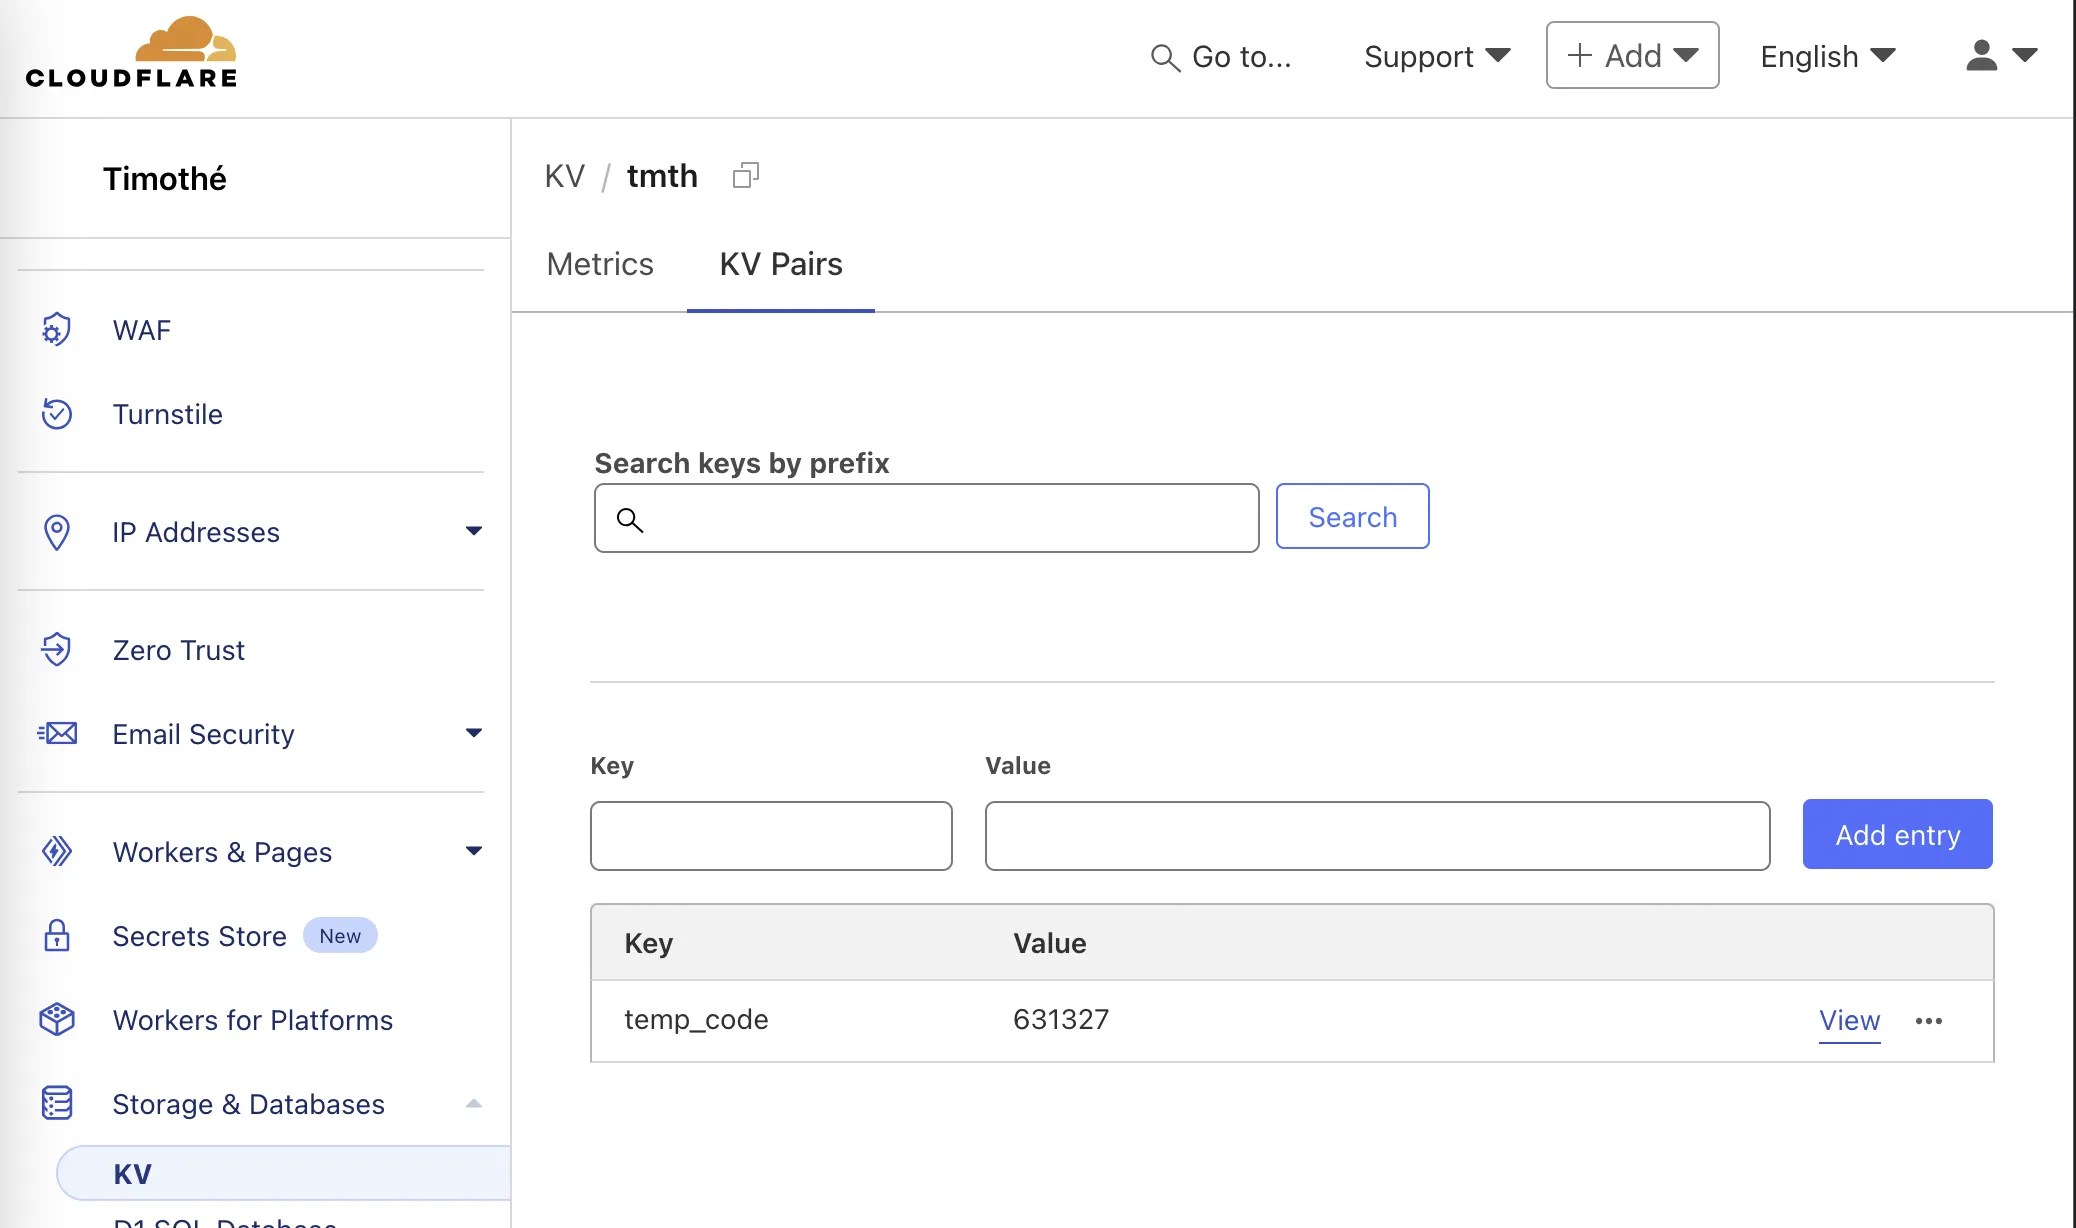
The codes will be saved here
Then I go back into Worker: Workers & Pages / my worker / Settings. Under “Bindings”, I create a connection to my KV store, which I name “BINDING_KV”. Finally, in my code, I can save the received value using this:
if (match) {
  // match corresponds to the regex matching the 6-digit code
  await env.BINDING_KV.put("temp_code", match[0]);
}
Generating 6-Digit TOTP Codes
To retrieve the 6-digit temporary “2nd Factor Authentication” that change every 30 seconds, I took the easy route. I found this JavaScript example by turistu on GitHub.
// This part I borrowed from the internet
async function generateTOTP(key, secs = 30, digits = 6){
  return hotp(unbase32(key), pack64bu(Date.now() / 1000 / secs), digits);
}
async function hotp(key, counter, digits){
  let y = self.crypto.subtle;
  if(!y) throw Error('no self.crypto.subtle object available');
  let k = await y.importKey('raw', key, {name: 'HMAC', hash: 'SHA-1'}, false, ['sign']);
  return hotp_truncate(await y.sign('HMAC', k, counter), digits);
}
function hotp_truncate(buf, digits){
  let a = new Uint8Array(buf), i = a[19] & 0xf;
  return fmt(10, digits, ((a[i]&0x7f)<<24 | a[i+1]<<16 | a[i+2]<<8 | a[i+3]) % 10**digits);
}
function fmt(base, width, num){
  return num.toString(base).padStart(width, '0')
}
function unbase32(s){
  let t = (s.toLowerCase().match(/\S/g)||[]).map(c => {
    let i = 'abcdefghijklmnopqrstuvwxyz234567'.indexOf(c);
    if(i < 0) throw Error(`bad char '${c}' in key`);
    return fmt(2, 5, i);
  }).join('');
  if(t.length < 8) throw Error('key too short');
  return new Uint8Array(t.match(/.{8}/g).map(d => parseInt(d, 2)));
}
function pack64bu(v){
  let b = new ArrayBuffer(8), d = new DataView(b);
  d.setUint32(0, v / 2**32);
  d.setUint32(4, v);
  return b;
}
To use it, it needs to be called with the 2FA token. If you only get a QR code from enabling 2FA on your account, you need to scan it and retrieve the part in “secret=XXXX”.
const codeTotp = await generateTOTP("ABCDEFGHIJKL0987654321MNOPQRSTUVWXYZ");
Exposing these codes on a web app
Now I need to expose this on a web page. For that, no need to change the Worker. I use the same one by adding this snippet:
export default {
  async email(message, env, ctx) {
    // ...
  },

  // fetch() is used for each request made via the web
  async fetch(request, env, ctx) {
    // I retrieve the value of "temp_code"
    const codeMail = await env.BINDING_KV.get("temp_code");
    // I retrieve the TOTP value
    const codeTotp = await generateTOTP(env.TOKEN_OTP);

    // I build the result
    const response = `Code received by email: ${codeMail}\n\n 2FA Code (valid 30s):\n\n${codeTotp}`

    return new Response(response || "Error building the response");
  },
};
Environment variables
I’ve mentioned values like env.SOMETHING several times now. A quick recap of what we have so far:
env.MAIL_FORWARD: my personal email, saved in environment variablesenv.BINDING_KV: the connection to the Cloudflare KV store, already provisioned via bindingsenv.TOKEN_OTP: The token used to generate a 2FA code
Apart from BINDING_KV which is handled via bindings, the other two values need to be filled in as environment variables.
For this, I go back to my Worker, then Settings.
In “Variables and Secrets”, I can easily add my values. Whether they are set as “Secret” or “Text” doesn’t change how they’re accessed in the code, so I set both as secrets (Secrets are encrypted and not visible in the dashboard after saving). You need to click “Deploy” when done.
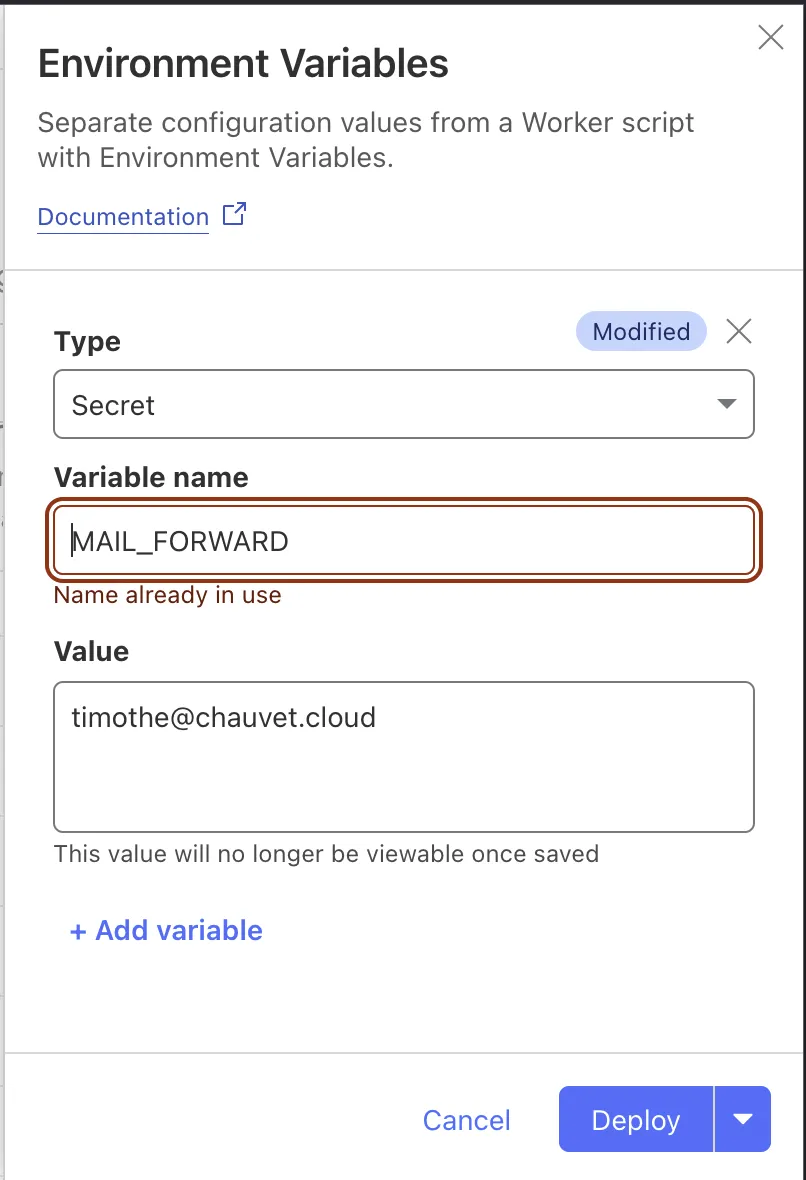
Environment variables can easily be edited
Managing access
I (obviously) don’t want everyone to be able to access these codes.
I want to keep it simple: send unique links to people. I also want to be able to easily revoke their access.
For this, I’ll deploy another environment variable, this time in JSON format.
- Type: JSON
- Variable name: AUTHORIZED_URLS
- Value:
["a1b2c3d4","z9y8x7w6"]
This way, I just have to remove the code (the string in the array) I no longer want to be active.
To implement this in the code, I get the accessed URL and the path segment after the domain (e.g., www.mysite.com/thecode) to check if it’s in my list.
export default {
  async email(message, env, ctx) {
    // ... (email handling code)
  },

  // fetch() is used for each request made via the web
  async fetch(request, env, ctx) {
    // I get the URL and split its pathname by '/' characters
    const url = new URL(request.url);
    const pathSegments = url.pathname.split('/').filter(Boolean);

    // I check if the value after the '/' is in the list
    if (env.AUTHORIZED_URLS.includes(pathSegments[0])) {
      // ... (answer building code)
      return new Response(response || "Error building the response");
    }

    return new Response("Unauthorized", { status: 401 });
  },
};
I can also, by using an else if on other lists, have a single Worker for multiple accounts and return a different response each time.
Custom domain
Cloudflare handles this quite easily, especially since your domain is already in Cloudflare.
I go back to my Worker, then Settings. The “Domains & Routes” allows me to configure my custom domain.
I click “Custom Domain”, add the domain “code.timothechau.vet”, and Cloudflare guides through the setup (usually involving adding a CNAME record).
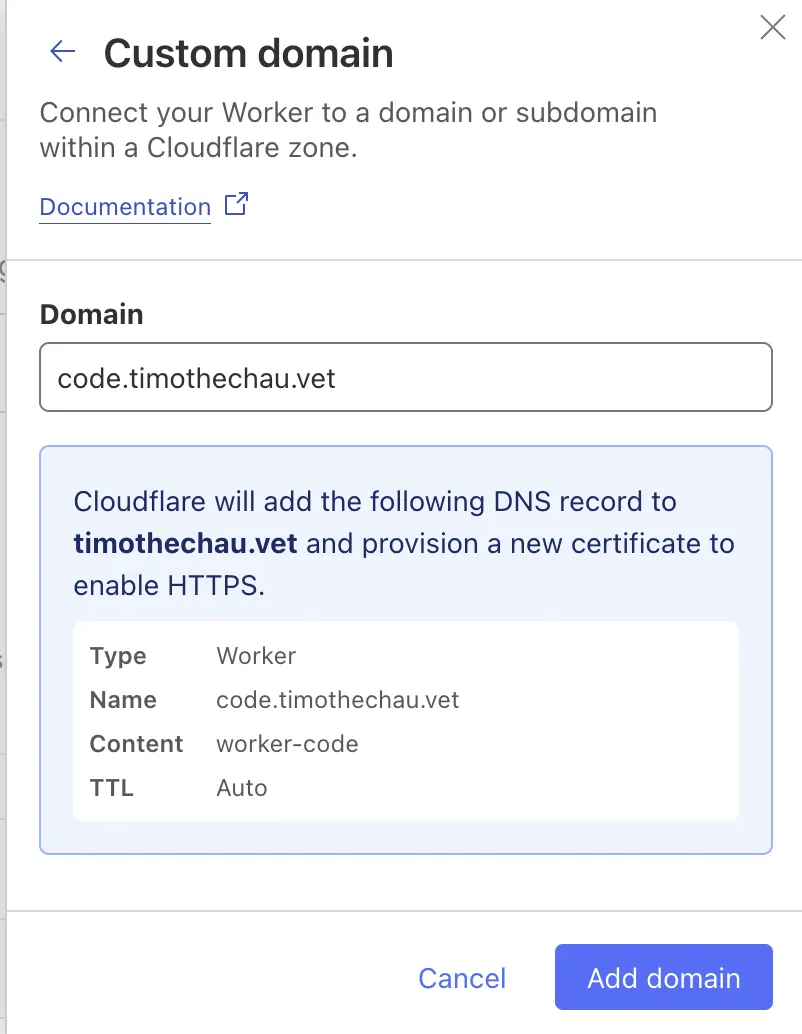
My domain timothechau.vet is already in Cloudflare. Otherwise, I would've needed tk add it manually first.
tl;dr
So, the steps were:
- Add your domain to Cloudflare.
- Create an empty Worker.
- Add a rule in your domain’s Email / Email Routing / Routing Rules to “Send to Worker”.
- Create an empty key-value store in Storage & Databases / KV / Create.
- Bind the KV namespace in the Worker / Settings / Bindings.
- Create environment variables
MAIL_FORWARD,TOKEN_OTP,AUTHORIZED_URLS(JSON) - Deploy the code below.
- Attach a custom domain like
code.mydomain.comin the Worker / Settings / Domain & Routes
Here’s a recap of the final code. I’ve also put it in this repo
export default {
  async email(message, env, ctx) {
    const subject = message.headers.get("subject");
    if (
      message.to === "example@timothechau.vet" &&
      subject.startsWith("Your code is ")
    ) {
      const match = subject.match(/\d{6}/);
      if (match) {
        await env.BINDING_KV.put("temp_code", match[0]);
      }
    }
    await message.forward(env.MAIL_FORWARD);
  },

  async fetch(request, env, ctx) {
    const url = new URL(request.url);
    const pathSegments = url.pathname.split('/').filter(Boolean);

    if (env.AUTHORIZED_URLS.includes(pathSegments[0])) {
      const codeMail = await env.BINDING_KV.get("temp_code");
      const codeTotp = await generateTOTP(env.TOKEN_OTP);
      const response = `Code received by email: ${codeMail}\n\n 2FA Code (valid 30s):\n\n${codeTotp}`
      return new Response(response || "Error building the response");
    }
    return new Response("Unauthorized", { status: 401 });
  },
};

async function generateTOTP(key, secs = 30, digits = 6){
  return hotp(unbase32(key), pack64bu(Date.now() / 1000 / secs), digits);
}
async function hotp(key, counter, digits){
  let y = self.crypto.subtle;
  if(!y) throw Error('no self.crypto.subtle object available');
  let k = await y.importKey('raw', key, {name: 'HMAC', hash: 'SHA-1'}, false, ['sign']);
  return hotp_truncate(await y.sign('HMAC', k, counter), digits);
}
function hotp_truncate(buf, digits){
  let a = new Uint8Array(buf), i = a[19] & 0xf;
  return fmt(10, digits, ((a[i]&0x7f)<<24 | a[i+1]<<16 | a[i+2]<<8 | a[i+3]) % 10**digits);
}
function fmt(base, width, num){
  return num.toString(base).padStart(width, '0')
}
function unbase32(s){
  let t = (s.toLowerCase().match(/\S/g)||[]).map(c => {
    let i = 'abcdefghijklmnopqrstuvwxyz234567'.indexOf(c);
    if(i < 0) throw Error(`bad char '${c}' in key`);
    return fmt(2, 5, i);
  }).join('');
  if(t.length < 8) throw Error('key too short');
  return new Uint8Array(t.match(/.{8}/g).map(d => parseInt(d, 2)));
}
function pack64bu(v){
  let b = new ArrayBuffer(8), d = new DataView(b);
  d.setUint32(0, v / 2**32);
  d.setUint32(4, v);
  return b;
}
If you have any questions or suggestions, feel free to contact me by email, on LinkedIn, or directly by sending an issue on GitHub.