
Timothé Chauvet
Saturday, June 1, 2024
Set up a Catch-All email for cheap 📥
Until now, whenever a restaurant or website asked for my email address, I was reluctant to give out my real address. I’m obsessed with never reusing the same password, and I also don’t want my email address to be sold to third parties. If this is your case, there are several solutions, including the Catch-All email address which allows you to use any different addresses as you wish.
Just imagine:
- You go to your favorite Le Caleçon Français store.
- You are offered a loyalty card to reward you for being a good customer.
- You are asked for your email.
- You proudly reply: “caleçon at timomail dot fr”.
- The person at the cash register, puzzled, asks you to repeat.
Yes, she heard you correctly. You could also have answered lecaleçonfrançais@timomail.fr, lcf@timomail.fr or even how-long-are-they-going-to-make-me-repeat-myself@timomail.fr and it would have worked.
Even without explicitly creating the address caleçon@timomail.fr, you can be sure that the newsletters will arrive at their destination. It’s because you activated the Catch-All on timomail.fr that it’s possible.
I mentioned some reservations in the conclusion that are to be taken into consideration.

"Envelopes" banner generated by Dall•E on ChatGPT
Why use a different email each time?
According to the Have I Been Pwned website which lists data breaches, there are at least 13 billion compromised accounts. These do not necessarily include passwords, but if you reuse the same one on each site, it is very easy to hack you with a single breach.
If I have always used a different password for each account, I only very recently started using a different email for each account as well. Who among us has never created a trash email to
- avoid spam
- protect yourself from leaks
- or register on a shady site? (yes, we’ve all done it)
The idea behind using a different email is that it becomes more difficult to trace all your accounts. Several methods exist:
Create a trash email: an email that you only use for shady sites, but that you will reuse oftenUse + aliases: an option available on some email providers like Gmail or Proton, which consists of adding a + after the identifier. For example, timothe+badoo@gmail.com will forward emails received to timothe@gmail.com. The downside is that some sites don’t accept it, and a person knowing the trick can simply remove the + to find your original addressSubscribe to an email generatorthat will allow you to create emails on the fly, such as Firefox Relay or Proton Pass. It is also possible to disable them to stop emails, or block spam at the root. This option requires you to generate the email before using itUse a temporary emailthat will self-destruct after a certain time, such as Temp Mail. The downside is that once the email is destroyed, you will no longer be able to see your emailsUse a Catch-All email: an address that receives all emails sent to any identifier on your domain. The downside is that it needs to be configured and you need to own a domain name
| Anonymity | Spam management | Breach-proof | Setup | Use | Price | |
|---|---|---|---|---|---|---|
| Personal email | 🌧️ | ⛅ (filters) | 🌧️ | ☀️ | ☀️ | 0€ |
| Trash email | ⛅️ | ☀️ | 🌧️ | ⛅️ | ☀️ | 0€ |
| Alias + | ⛅️ | ⛅ (filters) | ⛅️ | ☀️ | ⛅️ | 0€ |
| Email generator | ☀️ | ☀️ | ☀️ | 🌧️ | 🌧️ | 12€/year(Firefox Relay) |
| Temporary email | ☀️ | ☀️ | ☀️ | ⛅️ | 🌧️ | 0€ |
| Catch-all email | ☀️ | ☀️ | ☀️ | 🌧️ | ☀️ | 7€/year(.fr domain) |
I don’t know about you, but I count more ☀️ in the Catch-All option. As for the 🌧️ in Setup, we’ll fix that in this article!
1. Buy a domain name
To begin, let’s buy a domain name. My favorite registrar, OVH, offers them at low prices, but any registrar can do the same.
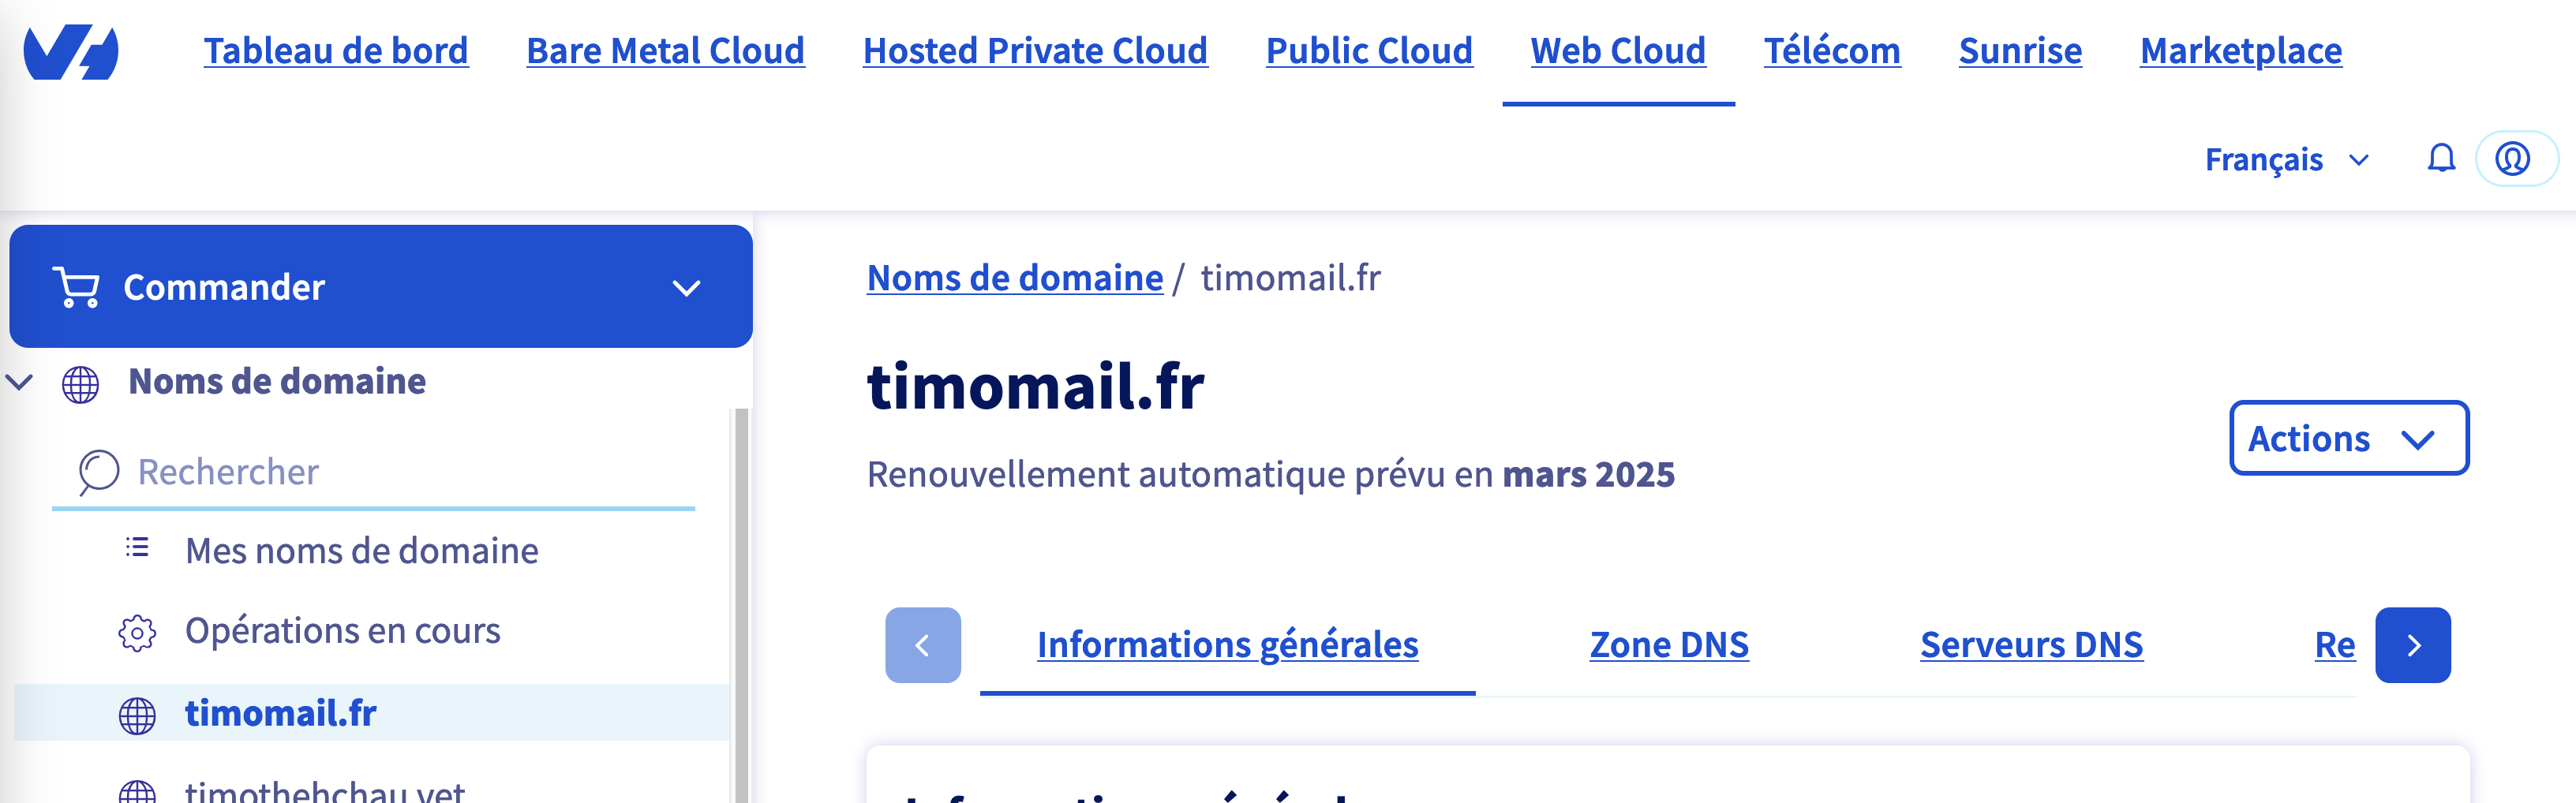
Management interface of your domain on OVH
- Go to OVH or another registrar of your choice
- Search for an available domain, for example timomail.fr
- Add it to your cart
- Don’t buy any hosting option, you don’t need it. Uncheck “DNS accelerator” and such, which are paid
- Optionally, reserve your domain name for several years, the price of which will naturally increase each year
- Pay and create your account
- Wait for your domain name to be available on your portal (about 15min)
Once you have your domain name, you now need to get rid of the current DNS servers for those of CloudFlare.
2. Register your domain on CloudFlare
The second step is to register on CloudFlare, which allows the Catch-All functionality and is free.
- Register on CloudFlare if it’s not already done
- Once on your interface, click on “Add a site”
- Enter your domain name and choose the Free option
- CloudFlare needs to scan the domain, and then prompts you to change the DNS servers
- Copy the 2 DNS servers and replace those in the “DNS Servers” tab of your registrar
- Wait for CloudFlare to validate the change (about 15min)
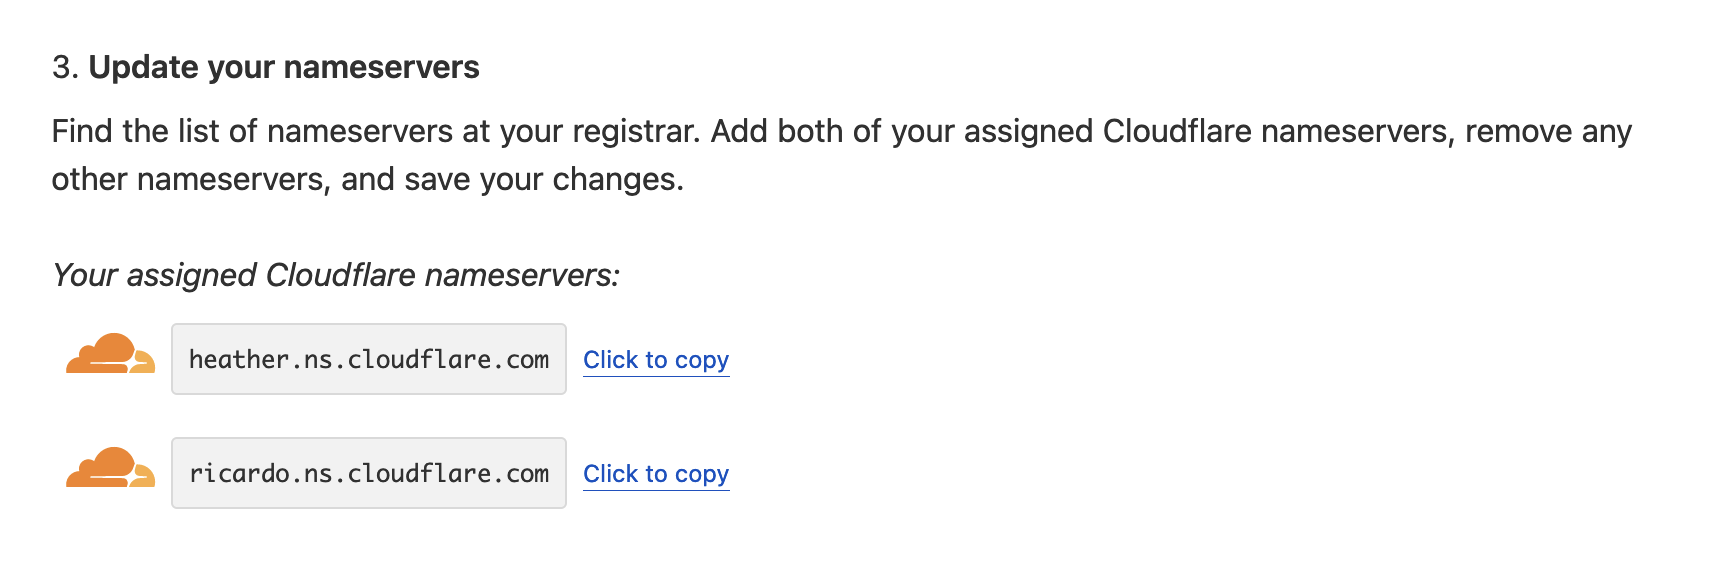
CloudFlare asks to install 2 DNS servers
3. Configure the Catch-All email
Now that your domain is on CloudFlare servers, you can manage DNS entries as you like. For the purposes of this tutorial, we won’t need to do that.
- In the “Email” tab, go to “Email routing”
- Do “Getting started” then “Skip” to skip the configuration
- You should have a text “Email Routing is currently disabled and not routing emails. Enable Email Routing”; click on “Enable Email Routing” if so
- Delete all the records that CloudFlare shows, and add the ones proposed by CloudFlare
- Once the change is made (1-2min), go to the “Routing rules” option
- In “Catch-all address”, configure the action to “Send to an email” then put the recipient email that will receive all emails sent to the domain
- Save, and remember to activate the option in “Status”
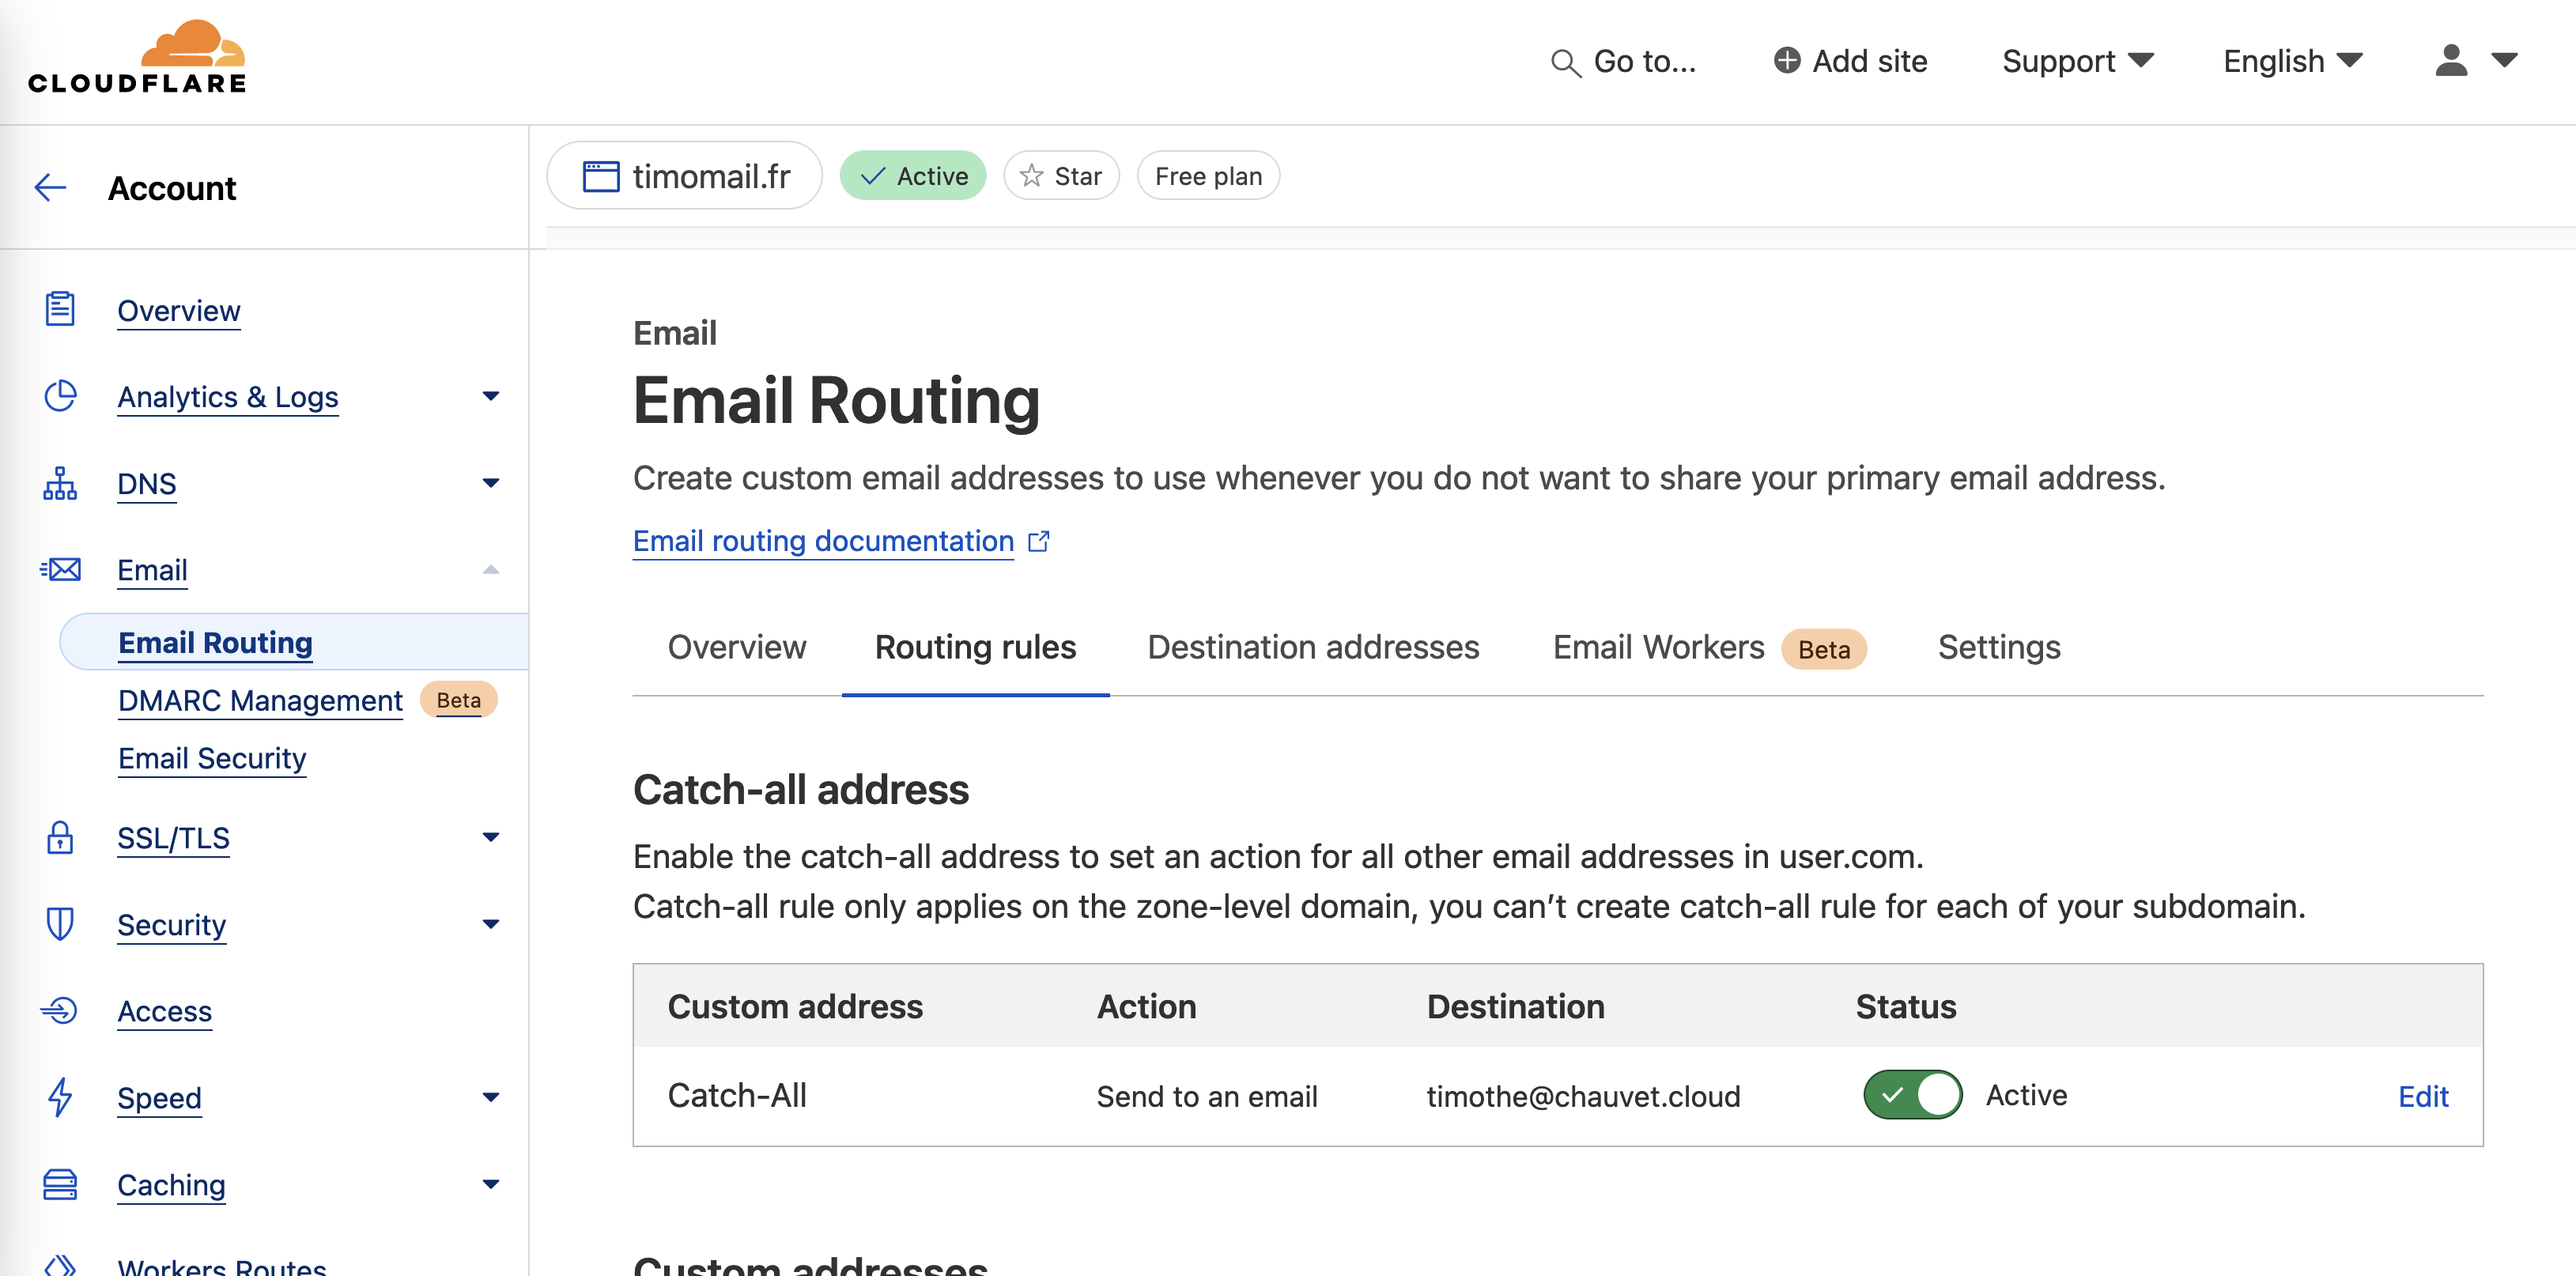
Make sure the Active option is enabled
Conclusion
It wasn’t that complicated, was it? By taking an hour out of your weekend and €7 a year, you can now receive your emails at as many addresses as you like, while keeping just one main email.
Please bear these points in mind:
- Your registrar may publish information about you. Find out about
hide whois <your-registrar>if you haven’t chosen OVH (which hides this information by default). - Make sure you keep payment active on your registrar, otherwise you risk losing your domain! In all cases, you’ll be notified by email before the expiration date.
- Some sites require you to enter an email address on Gmail or Outlook. Refer to the “Trash email” option 👀
- You can’t send mail with this address, only receive it.
- Actually you can, but it requires configuration with another mail service, which means removing the Catch-All if that mail service doesn’t have the option.
- Google Workspace and ProtonMail Plus allow you to send/receive mail with your domain in addition to Catch-All, but you have to pay for them. There are others ones I don’t know about.
- Alternatively, you can reply with the recipient email mentioned in step 3.6.
If you have any questions or suggestions, please don’t hesitate to contact me by mail, on LinkedIn or directly by opening an issue on GitHub